Setup Git LFS with Nexus as Backend
Sometimes I need to keep binaries that I’ll later use during an installation. I’d like to keep these in a git repo. But their size and “binary format” makes them unsuited for a git repo. Thanks to Git LFS (Large File Storage), I can keep them in git while keeping their sizes small because they’ll be stored in Nexus Repo Manager as Git LFS repositories.
From the perspective of using them, say, consuming them via curl, I’d be getting them from Nexus. As a “consumer”, Nexus is my single source of truth for such binary files or exectables.
As a “producer”, a git repo would be my source of truth. Ofcourse, I’d also need to push them to a Nexus repo where my “consumer” expects to retrieve them from. As such, I’d need the following:
- prepare Nexus to be the backend to store the git-lfs files;
- configure a git-lfs enabled git repository;
Prepare Nexus Repo Manager
Setup the repository where to store git-lfs files
An example could be a repository in Nexus named my-gitlfs-hosted-repo, such that the whole Url is https://nexus.url.com/repository/my-gitlfs-hosted-repo/
Prep user in Nexus Repo Manager for git-lfs
This step is about setting the right roles for the user who’s going to push to Nexus Repo Manager. This user can be a “normal” user or a non-personal technical user or service account. This user needs to have the role nx-developer-git-lfs in Nexus Repo Manager.
Steps:
- As the user with the
nx-developer-git-lfspermissions, log into Nexus Rep Manager. - Go to your accout page -> User Token -> click the button, “Acccess user token”.
- Save the
User token nameandUser token passodeof your user. - Later on, when working on your dev machine and git prompts you for credentials, use these:
- For the username, enter the
User token name - For the password, enter the
User token passode
- For the username, enter the
- Using you “normal” user’s credentials for github or Nexus Repo Manager will fail with such an error:
1
2
3
4
Uploading LFS objects:   0% (0/9), 0 B | 0 B/s, done.
batch response: Authorization error: https://nexus.url.com/repository/my-gitlfs-hosted-repo/info/lfs/objects/batch
Check that you have proper access to the repository
error: failed to push some refs to 'github.com:gh-org-or-username/my-git-repo.git'
Configure git-lfs on git repository
Install git-lfs
Follow the steps in Installation · git-lfs/git-lfs Wiki · GitHub.
Check that the installation worked by executing the command, git lfs env.
Set up a new repository that’s git-lfs enabled following the official tutorial
Setup git repo for git-lfs
In the git console, navigate to the git repo. We’ll add one big file.
Steps:
- Show which file extensions is git-lfs tracking?
git lfs track - Tell git-lfs to track certain extensions:
git lfs track "*.msi"or maybe a folder withgit lfs track "folderA/" - Git-lfs will save that information in
.gitattributes. When opened, it looks like*.msi filter=lfs diff=lfs merge=lfs -text - Commit
.gitattributesto the repo. - Add the
.msifile, and commit it.
Before pushing to the remote repo, we need to setup which bakend git-lfs should use.
- Add the backend url for git-lfs with
git config -f .lfsconfig lfs.url https://nexus.url.com/repository/my-gitlfs-hosted-repo/info/lfs/ - This generates a
.lfsconfigfile that should be added and committed to the repo. When opened, it looks like this:[lfs] url = https://nexus.url.com/repository/my-gitlfs-hosted-repo/info/lfs - Run
git lfs envto check that theEndpointkey points to the Nexus url.
On your first push, git will ask for credentials (for me, git asked for them twice even though pushing one file). Now we can use the token name and token code that we retrieved in section “Prep user in Nexus Repo Manager for git-lfs”
- For the username, enter the
User token name - For the password, enter the
User token passode
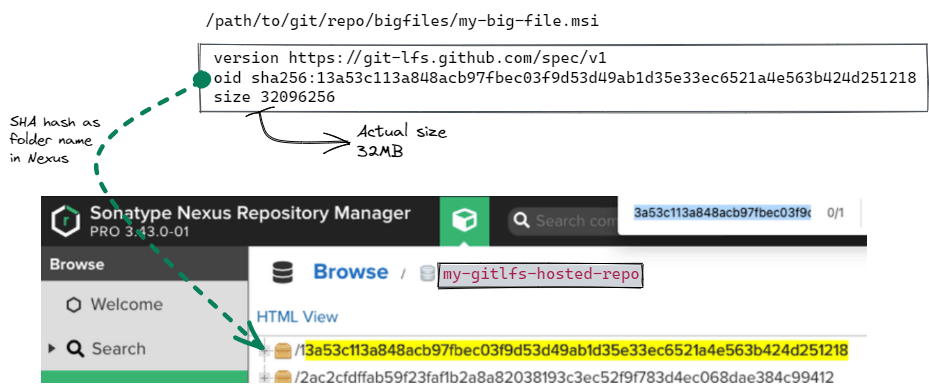
When git is finished with pushing, take a look at the .msi file: it’ll contain the SHA for the file. And the SHA corresponds to the filename in Nexus.
 Big file’s SHA in Git will be the same in Nexus
Development workflow
Clone for local dev
Running git clone will retrieve all the files.
- The executables will also be downloaded.
- Run
ls -halto check that the sizes are the same.
Add files to the repo, commit, and push.
Push to Nexus (manually or via CI)
Whether pushing to Nexus manually or using a CI tool, I need the Tokens for my user in Nexus.
- Log into Nexus.
- Navigate to user’s profile.
- Click the “Tokens” button. Save the
Token UsernameandToken Passcode
Save those tokens in the shell’s terminal (there’s a TIL for that) )
1
2
3
4
5
6
7
8
9
10
11
12
13
14
15
16
17
18
19
20
21
# prompt for user for username.
read -s -p "Enter Token username: " TOKEN_USERNAME
# User types the username

# export as env var
export TOKEN_USERNAME

# prompt user for password
read -s -p "Enter Token Passcode: " TOKEN_PASSCODE
# User types the username

# export as env var
export TOKEN_PASSCODE

nexus_uri=https://nexus.url.com
repo=raw/path/stage/binaries
file=my-big-file.msi

curl --verbose \
--user $TOKEN_USERNAME:$TOKEN_PASSCODE \
--upload-file $file $nexus_url/repository/$repo/$file